XPLR-IOT-1
Application platform
Tech
|
01 Jul 2022
ubxlib speeds up the development of connected applications by replacing module-specific AT commands with a common set of APIs that make you feel at home.

The increasing complexity of IoT devices is forcing product developers to learn to work with more and more technologies, each with their inherent challenges and intricacies. In this blog post, we'll look at how a new tool we just released, the open source ubxlib library, simplifies application development, reducing the risk for errors and cutting time to market. You'll find out we used ubxlib, which is available for download on Github, to build a sophisticated sensor aggregation solution that could be turned into a commercial indoor or environmental sensing device.
Over the past couple of decades, we've had a front-row seat to the maturation of the Internet of Things as it evolved from enabling typically single-purpose devices like connected smoke alarms to highly complex, tightly integrated multi-functional solutions such as voice-controlled personal assistants. To take a simple but common IoT device, consider the environmental sensors you might see deployed in cities to monitor urban pollution. In the past, these devices might have consisted of a couple of sensors and a memory card to store the gathered data. Later, they might have been enhanced with a cellular modem to autonomously upload the data to the cloud.
Fast-forward to today, and environmental sensors are often much more sophisticated, potentially including a global navigation satellite system (GNSS) receiver to accurately timestamp and geotag sensed data, a Wi-Fi module to offload data when a Wi-Fi access point is within range, and a Bluetooth radio to configure the sensing solution using a smartphone. They might also include a whole host of additional sensors, such as accelerometers and gyroscopes to track motion, which can provide additional context or feed into machine learning algorithms for onboard data processing using edge AI.
To integrate all these technologies into a host application, application developers would normally have to be comfortable working with a handful of distinct sets of AT commands used to configure the cellular modem, the Bluetooth and Wi-Fi modules, the GNSS receiver, etc. This not only has a considerable impact on the time it takes to bring a new connected device to the market. Each additional technology also increases the likelihood that configuration errors, undetected bugs, or security vulnerabilities find their way into the application software running on the device.
This is where ubxlib fits in, offering developers a toolkit to overcome these challenges and simplify the development experience. But first, what exactly is ubxlib? ubxlib is a library for host microcontrollers that makes it easy to control u-blox modules. We deliver it as an add-on to existing microcontroller and real-time operating system (RTOS) software development kits (SDKs) to facilitate the integration of connectivity, security, and localization into embedded applications.
Rather than expecting developers to go through the arduous task of prototyping, testing, and debugging their own solutions, we developed ubxlib to make the best use of u-blox module features in your applications. If you are an application developer, you'll appreciate how working with a set of concise APIs that are uniform across a growing number of u-blox modules can increase the efficiency, reliability, and security of the application development process.
We didn’t develop ubxlib exclusively for customers. Our in-house developers use it too! In one example, we used ubxlib to build a connected sensor solution that collects sensor data -- including the device's position -- and then transfers the data to a cloud platform using either Wi-Fi or cellular connectivity. The basis of our solution is a u-blox C210 development board, which hosts all the necessary plumbing needed to make an IoT application work (power supply, memory, antennas, etc.), a selection of sensors, and the full gamut of u-blox technology:
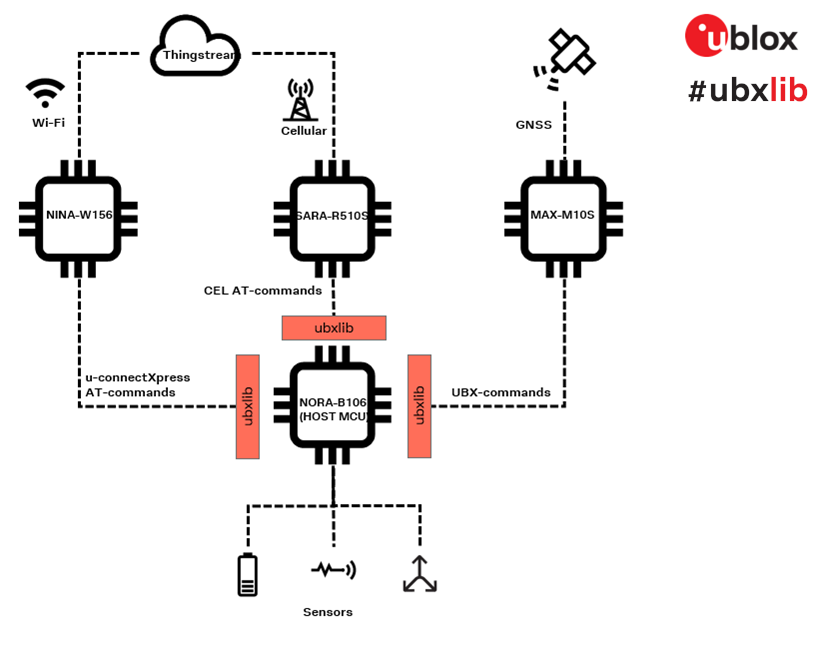
As illustrated above, the application, which runs on the NORA-B106 module uses ubxlib to read, write, and invoke commands to the other modules. The library includes low-level APIs that handle AT commands or the UBX protocol used by u-blox GNSS receivers, as well as high-level APIs used to handle network sockets over cellular and Wi-Fi connectivity, and to manage data exchange over Bluetooth LE. The MQTT client API further lets developers connect and communicate to an MQTT broker.
We have since turned the connected sensor solution into a reference solution that can be cloned from our Github repository, giving you a huge head start in the development of your connected solution. The Github repository is also full of ready-to-use examples demonstrating how the APIs can be used together with u-blox cloud services to build solutions to real-world problems. And while ubxlib is optimized for u-blox application boards and EVKs, it is not tied to specific RTOS or MCU platforms, but also runs on ESP32, STM32 with FreeRTOS, and nRF5 microcontroller platforms with ZephyrOS as well as on Windows and Linux PCs.
You don’t need a C210 development board at hand to dive straight into application development using ubxlib. A full list of compatible host platforms and peripherals is available Get off to a quick start by building on existing example scripts and build files that are all included in the ubxlib repository. Here’s a step-by-step description that should help you get off the ground:
And that’s it! You can find general information about the build system in the port directory, and platform-specific information is available in the port directory for your application’s MCU.
To learn more about ubxlib and how it can help you cut the time it takes to bring reliable and secure connected solutions to the market, be sure to check out the u-blox ubxlib GitHub repository as well as the ubxlib product page.
Magnus Johansson
Product Strategy Short Range Radio, u-blox
Harald Kroell
Product Management Cellular, u-blox
Application platform

Stand-alone Bluetooth 5.2 low energy modules

Stand-alone multiradio modules
LTE-M / NB-IoT modules based on u-blox chipset

u-blox M10 standard precision GNSS modules

Enable your device to connect from almost anywhere in the world

IoT Communication-as-a-Service SIM-based LPWA